Showing posts with label C#. Show all posts

Tuesday, August 14, 2018

MCP 70-483: How I Cracked Microsoft Certified Professional Exam 70-483 in 37 Days!

Cracking Microsoft Certified Professional Exam 70-483 in 37 Days!

Thinking of cracking this exam? Great decision! Yes! Cracking this exam can do wonders for you.


MCP 70-483 Certification Badge

It helped me to get my resume shortlisted and eventually getting an offer from Microsoft !! Crazy right ? Certifications do help when it comes to resume shortlisting but you should know your stuff, there's no shortcut there. After all, that's what interviews are meant for - to check if you are only good on paper or you really back what you wrote in your resume 😈


Alright!! After such a grandiloquent paragraph, let's discuss business - Certification Exam and Preparation. If you are just entering the world of Microsoft Certifications, I would recommend you to start here How I Cracked MTA 98-361 in 17 Days!


Let's concentrate on MCP 70-483 Exam now:

Why MCP 70-483 ?

Passing MCP 70-483 will help showcase the following:

  • You are well versed with C# and developing .NET Applications using C#.
  • You are a self learner and continuously update your skills and knowledge.
  • You are serious about your career and care to calibrate your skills and expertise.

Who should go for MCP 70-483 ?

When I appeared for the exam, I already had more than 02 years of experience in C# and .NET under my belt. The official website also suggests that candidates having 01 or more years of experience should go for it. That being said, with proper strategy and exhaustive preparation, one can crack this certification even if he/she doesn't have industry experience.

Image Source: Microsoft
However, keep in mind that this exam is not a cake walk and one has to dedicate time for it. As as a professional, I can assure you that working in a software development firm and cracking certification exams are two different things but they compliment each other.

What to expect in MCP 70-483 Exam ?

That's clearly stated on the official website as shown below:
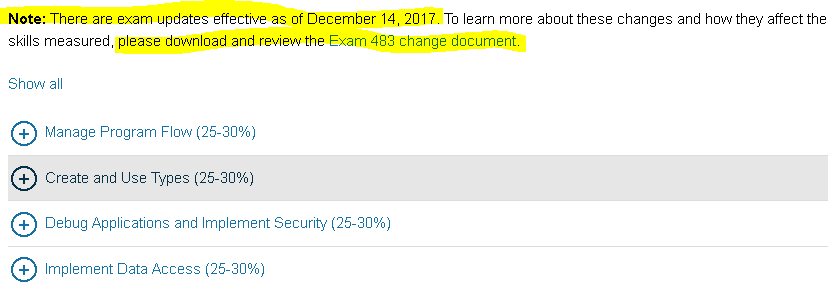
Image Source: Microsoft
Just click on the + icon to expand each topic and view the details.

Please pay attention to the highlighted part in the image. It suggests that there are some changes/ addition to the syllabus for the Exam 70-483. You must download the Exam 70-483 change document and make sure that you have covered all the topics including the newly added ones! Let's jump to the juicy part now - Preparation !

How did I prepare ?

Please note that we have to adhere to the NDA (Non-Disclosure Agreement) from Microsoft. Hence you'll not find exact questions and answers (or Brain-Dumps) here. However, if you sincerely follow the stated guidelines, you'll hit the bull's eye for sure.

The Bible for preparing for Exam 70-483 is the Book by Wouter de Kort published by Microsoft Press. I highly recommend that you study each and every topic from this book. This book really covers all the topics really well and you will be at a different level after completing this book. You can buy the book here - Buy Exam 70-483 Ref on Amazon

Please Note: I have given an exhaustive list of references at the end to help you prepare for the exam. 

Manage Program Flow (Day 1 - Day 8):


This section mainly consisted of - Multi-threading, Events and Delegates, Exception handling. I must confess here that if you have industry experience building software then this section will not be a big deal for you as you must have encountered these in your daily work. If you are a newbie learning on your own, it may take some time to get your head around this. Practice is the Mantra! 

Create and Use Types (Day 9 - Day 16):

This part concentrated on Value Types, Reference Types, Dynamic Types, Strings in C#. Pay close attention to these Interfaces is C# -  IComparable, IEnumerable, IDisposable and IUnknown. Also, Reflection is one of the important topics in C#. Give enough time to it as it's useful for exams and is a life saver when you make real world software.

Debug Applications and Implement Security (Day 17 - Day 24):

This section wants you to know about - Symmetric and Asymmetric Encryption, Security Certificates, Key Management, .NET Assemblies, Logging, Application Profiling.

I have personally experienced that people having 2-3 years of experience lack in this part of the exam e.g. Implementing Security, Application Profiling, Debugging Memory Leaks, etc... You'll usually see a developer having around 7-10 years of experience handling this stuff in the company. Less experienced Developers are mainly busy expanding the feature set of the Application. You feel me ?  Now you see why you should crack this exam 😉

Pro Tip: All you less experienced Developers/ newbies out there, invest enough time here! 


Implement Data Access (Day 25 - Day 32):

This section wants you to know all the possible cases in which you will handle your data e.g. Streams, Json/ Xml Data, Json/Xml Serializer/ Deserializer, LINQ (Very Important! ), and Collections - Lists, Dictionaries, Arrays, etc...


Again, if you have some industry experience then this section will be a cakewalk as handling the data is the most trivial task a developer does every single day! Even if you are studying on your own, this part is very interesting and it's easy to get the hang of it.

Miscellaneous (Day 33 - Day 37):

Relaxed my nerves. I tried to browse through every possible relevant link on the Web for 70-483 just to check if I missed anything. This is important because when you see a topic at random and know the concepts and can answer questions on that, it really boosts confidence.

Lastly, don't panic! It's just an exam but  make sure you do your due diligence. All the best! Let me know your certification experience in the comments section. 

Resources/ References

Here is the list of resources/ references that can be used in preparing for MCP 70-483:


What next after MCP 70-483 ?

So far so good! What next ? Well, you can use this Certification Planner from Microsoft to decide your paths and next certifications. I just want to add my 2 cents here - Also go for Azure Certifications as Cloud is and will be in the boom. I am myself progressing towards becoming a Cloud Architect. I will be posting articles on the same very soon. Stay tuned and thanks for stopping by!

I really hope that has been informative. Please share your certification experiences so that others can benefit too :)

Happy Coding!

Saturday, September 30, 2017

MTA 98-361: How I cracked MTA 98-361 in 17 Days!

MTA 98-361: How I cracked MTA 98-361 in 17 Days!


Yes! I literally cracked MTA 98-361 with 17 days of planned preparation 😁. It feels great to be a Microsoft Technical Associate in Software Development Fundamentals. The best part is I can show off the following badge on my Blog, LinkedIn , Resume, etc...

MTA 98-361 Certification Badge

Let's break down the process I followed so that it may help you.

Why MTA 98-361 ?

Let me tell you that passing MTA 98-361 is not a prerequisite to become a Microsoft Certified Professional (MCP). However I recommend to give it a shot so that you get the hang of Microsoft Certifications. Moreover, if you are starting a career in technology, it is one of the best entry level certifications. Make no mistake by thinking that it would be really easy to crack it. You will have to go for a planned preparation to make sure you crack it.

Who should go for MTA 98-361 ?

Here's what Microsoft suggests:

Image Source: Microsoft


What all can I expect in MTA 98-361 exam ?

Well! That's clearly stated on the Microsoft 98-361 certification website as shown below:

Image Source: Microsoft


How did I prepare ?

Please note that we have to adhere to the NDA (Non-Disclosure Agreement) from Microsoft. Hence you'll not find exact questions and answers (or Brain-Dumps) here. However, if you sincerely follow the stated guidelines, you'll hit the bull's eye for sure.

I already had some past experience in C#. I must say it was helpful in speeding up the preparation process. Even if you don't have any past experience in C#, don't worry! All you have to do is just go through a basic tutorial of C# such as this on on Microsoft Virtual Academy - C# Fundamentals for Absolute Beginners . The mantra to success is to cover all the topics/ concepts mentioned on the MTA 98-361 Website.

Alright! Here's the 17 day plan I followed:

Database Development (Day 1 - Day 5):  I started by gaining knowledge about Database development as I had very little exposure to Databases. It's good to master the things you know less about first. Please note that you should concentrate on SQL Server mainly. Important concepts include Normalization, Writing/ Understanding SQL queries, Connection Pooling, etc...

I will give an exhaustive list of resources/ references at the end of this article so that you find all the things at one place.

Web Applications (Day 6 - Day 9): Next, I concentrated on Web Applications. Here, the idea is that you understand about ASP.NET applications. Note that ASP.NET is a vast topic and difficult to master in a short period. Hence it's important that you cover at least the topics mentioned on the MTA 98-361 Website e.g. Page life cycle, State management, etc...  On the MTA 98-361 website, just expand the topic to view the concepts you should cover as shown below:

Image Source: Microsoft
Also, there are certain links/ preparation resources under each topic as shown below:

Image Source: Microsoft
It is highly recommended that you go through all the suggested Preparation resources. It may be time consuming if you are a total newbie but definitely worth the effort. 

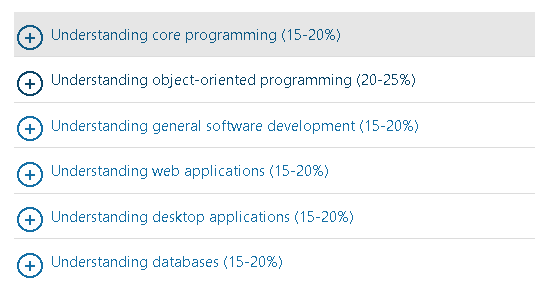
Understanding Programming (Day 10 - Day 12): I took on the following three topics in these three days:
  • Understanding Core Programming
  • Understanding Object Oriented Programming
  • Understanding General Software Development
You can expect many theoretical concepts in these sections and that's why it is easy to score here :)

Desktop Applications (Day 13 - Day 15):  This was personally the easiest part for me to prepare. We have to mainly look into Windows Services, Store Apps and Console Apps. Again, I want to emphasize that try to cover the topics mentioned on the MTA 98-361 website first. Then you can go into more details as per your interest and time at your disposal.

Miscellaneous (Day 16 - Day 17): In the last two days, I used to randomly google stuff about MTA 98-361 and swallow everything possible. I would say that I kind of brushed up/ touched upon all the important topics once again in these two days. The best example is this PDF I found out: Certiport Sample MTA 98-361 PDF

Resources / References

Lastly, here is the list of resources/ references that can be used in preparing for MTA 98-361:

There may be more resources that you'll may find out. I request you to mention them in comments so that we can extend this list and others can also benefit from the same.

I am also planning to make a complete Youtube Series on Preparing for MTA 98-361. I will update this post with the same once that is done.

What next after MTA 98-361 ?

This is an obvious question that comes into mind. The next exam you may want to take would be Exam 70-483. Read how I Cracked MCP 70-483 in 37 Days. Else I would recommend that you explore the possible Microsoft certification paths at following links:

I really hope that has been informative. Please share your certification experiences so that others can benefit too :)

Happy Coding!

Sunday, June 25, 2017

MVPVM: Designing Applications using MVP-VM

MVPVM: Designing Applications using MVPVM Design Pattern


Hey there! In this post we will be seeing how to design applications using MVPVM approach. If you're a .NET Developer and love MVVM more than your girlfriend, that's fine. You may still encounter situations where you may want to use MVPVMor you may land up in a project(that's what happened to me :) ) that uses MVPVM.

Introduction

MVP-VM stands for (Yes! You guessed it right!) Model-View-Presenter-View Model. It's yet another approach that brainy people came up with just to achieve so called "Separation of Concerns".

Really, that's all about it. Read on to get hang off MVPVM in the most shortest and practical way!

Design

We will be looking at this from the perspective of a .NET developer but the concept itself can be applied to any suitable situation on any development platform. Typically, this is how the simple design would like:

 
MVPVM Design Pattern
Source: MSDN Magazine December 2011

Let's kill them part by part.

View 

The user interacts with the view and this view delegates the user input actions to the presenter.

View Model 

This is nothing more than a class having Properties to which the controls in the UI bind to. And yes, they will have declarations of the Relay/Delegate Commands.

Model 

Again a class which models your data source (XML, JSON, Database, whatever! ). 

Presenter   

This is where you'd see most of your code. This class will have the implementation of Commands and hence will decide what happens on user input. Also, presenter will talk to the Business components which in turn will talk to Data Access components to get/put the data in from/to the Database.

Hope that crisp explanation was clear. Moreover, the diagram speaks for itself. Please comment if you have any doubt and I will try my best to address it.

Now comes the fun part, CODE! Yipeeeeeeeeee! 

Implementation 

In this section we will see a very simple implementation of MVPVM by creating a WPF Application. Let's get started!

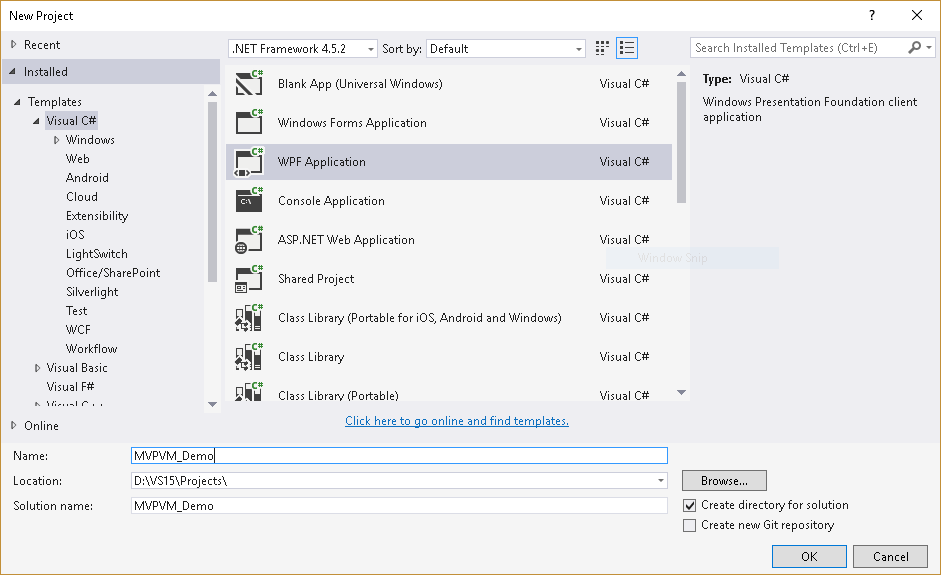
Step 1 - Create a WPF Application as shown below:


Step 2 - Make your project structure look like this. Add the necessary folders & files as shown below:


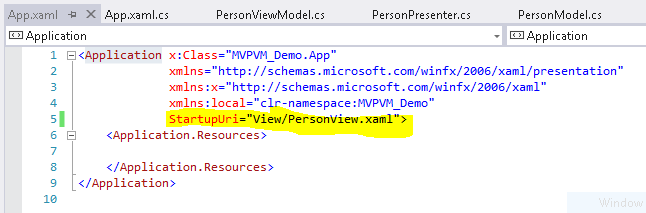
Step 3 - This is more of a tip. Just make sure that your App.xaml points to the correct view to show when the application starts as shown below:


Step 4 - Let us first design our view(PersonView.xaml). It will consist of a simple ListView which will show list of Persons and a Button. It will look like this:


Step 5 - This is how our Model class(PersonModel.cs) will look like. Pretty simple! Just one property i.e. Name.


Step 6 - This is how our ViewModel(PersonViewModel.cs) class will look like. Take special note of the Button Command Binding and ItemSource Binding of ListView. Obvious binding stuff, right ?


Step 7 - Alright! Here's the magic. This is how our presenter (PersonPresenter.cs) class will look like. Take special note of command handler implementation and the creation of ViewModel object inside the presenter.


Step 8 - This is how our PersonView code behind class will look like. Look at the minimal wiring we need. That's the beauty of XAML and MVPVM. As we all know, we should try to have as less code in code behind as possible to avoid strong coupling.


Step 9 - That's it! See the application in action. Click on any Person on the list and press the button. A message dialog appears stating which person is selected.


The above was a very simple application just to explain the concept.When you actually work on an enterprise level application having large and complex code base, you'll be more comfortable realizing the benefits of using patterns like MVPVM, MVVM, etc... Also, you will find people implementing the design pattern in different ways, but you should get the main concept. That's important. I know you'll have your own perspective and thought on this topic. I really appreciate that. Please use the comments section below and speak out loud. 

Summary

The objective is to have separation of concerns. ViewModel just declares the Properties and Relay Commands to which View Binds. The main logic resides in the Presenter. The Code Behind class just instantiates the object of Presnter class and sets the Data Context to ViewModel property present in Presenter.

Edit 1: One of my colleagues suggested the following point - When you use MVVM, the view model gets bloated with properties, business logic and hence becomes fat. But If you use MVPVM, your view model has just the declared properties and commands. All the business logic resides in presenter. That also gives us the possibility of reusing the view model if required. 


Hope that was informative.Good Day!

Saturday, April 9, 2016

Silent Installation of Applications Using C#

How To Silently Install Applications Using C#

There will be situations where you will need to install applications silently without any human intervention. This is a pretty normal use case for System Administrators and they love to automate their tasks. In fact knowledge of this subject may be handy for any technology worker in various circumstances. In this article we will silently install FileZilla on to the computer. Before we proceed further, here are a few things to keep in mind:
  • To install an application silently using the installer exe/package, you must use the Silent Switch for silent installation as described by the Vendor of the Software. For example Silent Switch for FileZilla is /S. It may vary for different applications.
  • Whether the application will install silently depends on how the packaging of the installer exe was done by the Vendor. So keep in mind that not every application can be installed silently.
  • You can use PowerShell cmdlets/ PowerShell Scripts/ Batch Scripts from within your C# application to achieve Silent Installation of applications. In this tutorials we will be using PowerShell cmdlet to achieve the same.
Scenario: In my case here I have the installer exes in "ApplicationRepository" folder in C drive as shown below.


We will only be installing FileZilla as of now but you can extend it for any number of applications as you wish.

Also let us make sure that FileZilla is not installed by looking at installed applications in Control Panel. As we can see below, FileZilla is not currently installed.


Now let us see the code which does the magic i.e. installs application silently.


using System;
using System.Collections.Generic;
using System.Collections.ObjectModel;
using System.IO;
using System.Linq;
using System.Text;
using System.Threading.Tasks;
using System.Management.Automation;

namespace SilentInstallation
{
    class Program
    {
        static void Main(string[] args)
        {
            ProcessFolder();
        }

        private static void ProcessFolder()
        {
            const string SOURCEFOLDERPATH = @"C:\ApplicationRepository";

            if (Directory.Exists(SOURCEFOLDERPATH))
            {
                Console.WriteLine("Directory exists at: {0}", SOURCEFOLDERPATH);
                if (Directory.GetFiles(SOURCEFOLDERPATH, "*.exe").Length > 0)
                {
                    int count = Directory.GetFiles(SOURCEFOLDERPATH, "*.exe").Length;
                    string[] files = Directory.GetFiles(SOURCEFOLDERPATH, "*.exe");

                    foreach (var file in files)
                    {
                        var fileName = System.IO.Path.GetFileName(file);
                        var fileNameWithPath = SOURCEFOLDERPATH + "\\" + fileName;
                        Console.WriteLine("File Name: {0}", fileName);
                        Console.WriteLine("File name with path : {0}", fileNameWithPath);
                        //Deploy application
                        Console.WriteLine("Wanna install {0} application on this VM? 
                                            Press any key to contiune.", fileName);
                        Console.ReadKey();
                        DeployApplications(fileNameWithPath);
                        Console.ReadLine();
                    }
                }

            }
            else
                Console.WriteLine("Directory does not exist at: {0}", SOURCEFOLDERPATH);

        }


        public static void DeployApplications(string executableFilePath)
        {
            PowerShell powerShell = null;
            Console.WriteLine(" ");
            Console.WriteLine("Deploying application...");
            try
            {
                using (powerShell = PowerShell.Create())
                {
                  //here “executableFilePath” need to use in place of “
                  //'C:\\ApplicationRepository\\FileZilla_3.14.1_win64-setup.exe'”
                  //but I am using the path directly in the script.
                  powerShell.AddScript("$setup=Start-Process 'C:\\ApplicationRepository
                 \\FileZilla_3.14.1_win64-setup.exe' -ArgumentList '/S' -Wait -PassThru");

                    Collection<PSObject> PSOutput = powerShell.Invoke();
                    foreach (PSObject outputItem in PSOutput)
                    {

                        if (outputItem != null)
                        {

                            Console.WriteLine(outputItem.BaseObject.GetType().FullName);
                            Console.WriteLine(outputItem.BaseObject.ToString() + "\n");
                        }
                    }

                    if (powerShell.Streams.Error.Count > 0)
                    {
                        string temp = powerShell.Streams.Error.First().ToString();
                        Console.WriteLine("Error: {0}", temp);

                    }
                    else
                        Console.WriteLine("Installation has completed successfully.");

                }
            }
            catch (Exception ex)
            {
                Console.WriteLine("Error occured: {0}", ex.InnerException);
                //throw;
            }
            finally
            {
                if (powerShell != null)
                    powerShell.Dispose();
            }

        }
    }
}

Now let us see this code in action using the following Screenshots:

Deploying/ Installing Application:


Depending upon the User Control Settings, there may be a prompt to allow our App to install another app(i.e. FileZilla). If you don't want this pop up and want absolute silent installation. Change your settings to Never Notify as shown below and again run the console App if required after changing the setting(Please Note : This setting is not recommended and it's good to revert after the demo).


If everything goes well, the application will be installed successfully as shown below.


Now again go to the Control Panel and refresh the list of installed applications. Now you will be able to see FileZilla installed on your Machine.


In the next version I will try to write a WCF service that can run on a Windows Server and you can hit it with a POST request with relevant information to install an application when required. This concept can be used at many places specially in Server Maintenance and Application Installation.

You can download the above source code and screenshots using the following link:
Download Silent Installation Zip

Hope you enjoyed the article.
Thank You


Saturday, March 5, 2016

UWP : How to detect current system language on Windows Phone

How to detect the current language in a UWP App

If you are making yet another awesome app and want to make it big at the global level, your App has to support multiple languages or has to support Localization as said by many. You can't target a global audience if you don't take care of their local language. But to do so you should be able to detect the language on the device and then only you can show relevant content in that specific language. This post analyzes how the language feature behaves in a Windows 10 Phone (Lumia Device ) and how to detect the language in a UWP App.


These were my observations :

1) Currently the language is set to English  (United States).

  
2) Long tap cestina and click move up or move whatever language you want to use to the top.


As you can see , it says "Restart phone". Till you restart the phone, you won't be able to detect the changes. You can test the same by using the UWP sample project at the end of the page.

3) If you move the current language (that was being used) to the top again, then the "Restart phone"  option disappears as shown below :

  
The moral of the story is that you will be able to see everything in the new language only after you restart. I kept cestina at the top and restarted the phone as suggested. Then I could see everything in cestina (as shown below) which were earlier in English.


 I tried almost 4 approaches to get the language of the phone just to see if any way gives me the latest language that I have moved to top. Unfortunately, even if you move up any new language, each approach still gives the current language that is being used. If you restart the device then all the approaches give the new language that was set. Things will be more clear when you download the sample project and play around with it.

Let's see the code that does the magic. This is the code in my MainPage.xaml.cs which does the trick:  

using System;
using System.Collections.Generic;
using System.IO;
using System.Linq;
using System.Runtime.InteropServices.WindowsRuntime;
using Windows.Foundation;
using Windows.Foundation.Collections;
using Windows.UI.Xaml;
using Windows.UI.Xaml.Controls;
using Windows.UI.Xaml.Controls.Primitives;
using Windows.UI.Xaml.Data;
using Windows.UI.Xaml.Input;
using Windows.UI.Xaml.Media;
using Windows.UI.Xaml.Navigation;
using Windows.Globalization;
using Windows.Globalization.DateTimeFormatting;
using System.Globalization;


namespace LangPOC
{
    /// <summary>
    /// An empty page that can be used on its own or navigated to within a Frame.
    /// </summary>
    public sealed partial class MainPage : Page
    {
       public static string lang;
        public MainPage()
        {
            this.InitializeComponent();
            this.Loaded += MainPage_Loaded;
        }

        private void MainPage_Loaded(object sender, RoutedEventArgs e)
        {
            var cultureName = new DateTimeFormatter("longdate", new[] { "US" }).ResolvedLanguage;
            textBlock.Text = cultureName.ToString();

            CultureInfo cultureInfo = CultureInfo.CurrentCulture;
            CultureInfo currentUIInfo = CultureInfo.CurrentUICulture;
            //String LanguageCode = cultureInfo.TwoLetterISOLanguageName;
            textBlock.Text = "Getting Lang from DateTimeFormatter - " + textBlock.Text + Environment.NewLine  
                             + "CultureInfo - " + cultureInfo + Environment.NewLine + 
                             "Getting the topmost lang in settings - " + lang + Environment.NewLine +
                             "CurrentUIInfo - " + currentUIInfo;
        }
    }
}


My current language is cestina and here is the output that the sample project gives: 


Now even if you move English (United States) to the top and run the sample project again, you will still get the above output i.e. cestina. But If you restart your phone and then run the sample project, you will get the language as English (United States). I have not gone into the details of the methods used in Code to get the language. Explanation of CultureInfo is all you need and is readily available. The idea was to analyze the behavior of the Windows Phone using a UWP App for language changes.  

You can download the UWP Sample App from the link given below (hosted on Google Drive) :

Hope this article helped you.
Thanks!! 

Saturday, February 27, 2016

UWP : How to check for Internet connectivity in a UWP Application

 Check for Internet connectivity in a UWP Application


Last Updated on : 28th February 2016

Hey guys !! Hope you are doing well. 

At times there are situations when you want your app to behave or respond to  Internet connectivity changes. If that is what you are looking for in case of UWP (Universal Windows Platform), you are at the right place.

Just like you, I was developing a UWP application and I got into a situation where detecting the changes in Internet connectivity and responding accordingly was crucial. Hence I started searching around and the solution wasn't too far. The class which comes to the rescue and does it all for you is :

Windows.Networking.Connectivity.NetworkInformation

I decided to play a little and hence made a simple POC(Proof of Concept) called InternetPOC that you can download and use. I have hosed in on Google Drive and you can find the link at the bottom of the page. Having said that, let us go through the steps on how to use the above class for our Internet connectivity check. All it takes are the following two steps:

Step 1 : Register the event handler for NetworkStatusChanged.
Step 2 : Write appropriate code in the handler to respond to change in Internet connectivity.

In my case, I have decided to show a dialog saying "Internet is present" when Internet connectivity is there and saying "Internet is not present" when internet is gone. I installed the app on my Windows Phone and tried turning my Wi-Fi on and off.and the results were as expected.

Case 1 : Internet is present


Case 2 : Internet is not present


Now let us go through the implementation. This is my MainPage.xaml.cs class where all the trick resides.


using System;
using System.Collections.Generic;
using System.IO;
using System.Linq;
using System.Runtime.InteropServices.WindowsRuntime;
using Windows.Foundation;
using Windows.Foundation.Collections;
using Windows.UI.Xaml;
using Windows.UI.Xaml.Controls;
using Windows.UI.Xaml.Controls.Primitives;
using Windows.UI.Xaml.Data;
using Windows.UI.Xaml.Input;
using Windows.UI.Xaml.Media;
using Windows.UI.Xaml.Navigation;
using Windows.Networking.Connectivity;
using Windows.UI.Popups;
using System.Threading.Tasks;


namespace InternetPOC
{
    /// <summary>
    /// An empty page that can be used on its own or navigated to within a Frame.
    /// </summary>
    public sealed partial class MainPage : Page
    {
        public MainPage()
        {
            this.InitializeComponent();
            // Registering the handler for NetworkStatusChanged
            NetworkInformation.NetworkStatusChanged += NetworkInformation_NetworkStatusChanged;
            CheckInternetAndShowDialog();
        }

        /// <summary>
        /// NetworkStatusChangeHandler : Implementaion of what to do when Internet Connectivity changes 
        /// </summary>
        /// <param name="sender"></param>
        private void NetworkInformation_NetworkStatusChanged(object sender)
        {
            // This is what happens when Network Status Changes 
            CheckInternetAndShowDialog();
        }

        private void CheckInternetAndShowDialog()
        {
            Task.Run(async () =>
            {
                var connectionProfile = NetworkInformation.GetInternetConnectionProfile();
                bool HasInternetAccess = (connectionProfile != null &&
                                     connectionProfile.GetNetworkConnectivityLevel() ==
                                     NetworkConnectivityLevel.InternetAccess);
                if (HasInternetAccess)
                {
                    MessageDialog md = new MessageDialog("Internet is present");
                    await md.ShowAsync();
                }
                else
                {
                    MessageDialog md = new MessageDialog("Internet is not present");
                    await md.ShowAsync();
                }
            });
        }
    }
}


You can download the full project from the following link (Hosted on Google Drive):


Saturday, January 2, 2016

C# : Implementation of List using C#

How to implement List in C#


If you ever had the opportunity to learn C or C++, you must be very comfortable with the concepts of Linked List . C# goes further and provides you with a data structure called List.  The list data structure is one of the most used data structures in any programming language and it is evident from the fact that every modern language, let it be Java, Python, etc ... support the List Data Structure. Hence having the concepts of List in your bag will make you an even complete Programmer. There will be various situations where you would love to use lists. Some of them may be : 

  • Making a Playlist when you make a Media Player Application.
  • Making a list of Recipes if you are making a Cooking Application.
  • Showing the rows fetched from a Database in the form of a list.
  • Showing the products in a list if you make an E-Commerce Application.
  • And at many countless places ...
In short, a list is an Abstract Data Type that represents an ordered  sequence of values. Some of the operations that you can directly perform on a list in C# are :

  • To check whether the list is empty or not.
  • To add an item to the list.
  • To count the number of items in the list.
  • To remove an item from the list at any index (first , last , middle, at any index).
  • To sort the items in the list.
  • To search for an element in the list.
  • To  find the average of values/items in the list.
  • To remove all the elements of list at once.
  • To find the maximum value in a list.
  • To find the minimum value of a list.
  • To set the capacity of the list (i.e. the number of items it can hold).
  • And many other operations (Thanks to C# :) ) .

Let us directly jump to the implementation of the list.

Step 1:  Open Visual Studio Professional 2015


Step 2:  Click on New Project. Select Console Application and give desired Name to the application


Step 3:  Click on OK and you will get the following Screen


Step 4The overall implementation or the code should like the following.

using System;
using System.Collections.Generic;
using System.Linq;
using System.Text;
using System.Threading.Tasks;

namespace ListConsoleExample
{
    class Program
    {
        static void Main(string[] args)
        {
            // Main Method
            // In this example we will see basic implementation of Data Structure:List 
            // using the language C#.

            //Declaring a List of integers 
            //(You can make List of other Data Types as you want e.g string,etc..)
            List<int> testList = new List<int>();

            //Adding elements to the end of List
            Console.WriteLine("Adding elements to the end of list");
            for (int i = 0; i < 6; i++)
            {
                testList.Add(i+1);
            }
            Console.WriteLine("Adding of Elements to the List is finished");
            
            // Accessing any element from the list using the index
            Console.WriteLine("Element in List at index 5 is : " + testList[5]);
            
            Console.WriteLine("Iterating through the List and printing the value");

            for (int i = 0; i < 6; i++)
            {
             Console.WriteLine("Element in List at index " +  i + " is : " + testList[i]);
            }
            Console.WriteLine("Iterating through the List is finished");

            // Removing any element from the list using index
            Console.WriteLine("Removing element 3 from the List");
            testList.RemoveAt(3);
            Console.WriteLine("Element at index 3 removed from the List");

            testList.Add(0);
            Console.WriteLine("Before Sorting :");

            foreach(int item in testList)
            {
                Console.WriteLine("The item is : " + item);
            }
            //Sorting the list
            testList.Sort();

            Console.WriteLine("After Sorting :");

            foreach (int item in testList)
            {
                Console.WriteLine("The item is : " + item);
            }

            // Waiting for enter to be pressed by user to prevent the Console Screen from 
            // closing automatically
            Console.ReadLine();
        }
    }
}
  

Step 4The output for the above code should like the following.:


Let us know if you liked the article through your comments and feedback . Cheers!!